Follow Us

Facebookpinterestlinkedininstagram
Mar 212014
 

posted by Pretty Presets  |  Lightroom Tutorials

Welcome to the first in a series of ten tutorials designed to help Pretty Preset customers use their products effectively and efficiently.

Today, we are talking about smoothing skin with the Skin Smooth brush from the Perfect Portrait brush collection.

If you are new to brushes, once the brushes are installed, to access them, click on the brush icon below the histogram, then click where the second arrow is pointing to in the image below. It may say “Exposure,” or “Contrast,” etc. Click there and the brush menu list will drop down. Move your mouse down the list to see all the names and click on Skin Smooth when you see it.


Before you smooth skin, you should first make sure to brighten your subject, if needed. If the skin is underexposed then blemishes, wrinkles, etc. will be much more noticeable. Exposure can be easily fixed with the Add Light brush.

On to smoothing the skin. Select the Skin Smooth brush and select your flow.  The brush is fairly strong, so it may be too much smoothing if your subject is young, so reduce the flow a bit. Tip: you do NOT want skin to be over-smooth because then they can look like plastic and that is not a good thing.

For those who don’t know, flow is how much of the brush effect that you see with each stroke (when you click and move mouse over an area). When the flow is reduced, the full strength of the brush does not show through. So, if you have a brush with a strong effect, you can reduce the flow so that not as much of it is applied to your image.

Now start brushing over the skin. A pin will be anchored down wherever you start brushing. Make sure you use a brush size that suits the job. That means make the brush large enough to cover the area quickly. You can make your brush bigger or smaller with the [  ] keys on your keyboard, or by using the scroll wheel on your mouse.

Once you start a new pin click “done” at the bottom of the image, the pin will turn all white. If you wish to go back to that pin/change and want to alter something, just click the pin. When it goes back to black and white, it is active again.

You may or may not see a red color on the area you brush over. This is your “mask,” and is only there to show you were you brushed already. If it is distracting to you, it can be turned off at the bottom of the image (an arrow is pointing to it in the image above).

If you hit an area you did not mean to brush over, you do not need to delete and start over. Instead, change your brush to the Erase brush and brush over the unwanted area.
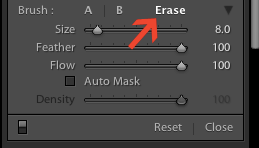
 

Once your are finished editing with the brushes, click Done in the bottom right corner, below the image. You can continue on editing or export the image if you are finished.

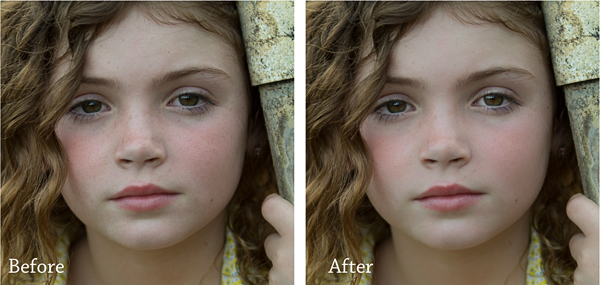
Below is a comparison of before and after the Add Light and Smooth Skin brushes.  View more brushes from this collection here.
Hello!  I’m Amanda, a quirky, introverted Mom of four, who is passionate about helping others learn their cameras and editing software. I also currently homeschool my four kids, ages 13 to 6, all whom run away when they see me carrying my camera.  Visit me at my website and facebook page.

Mar 142014
 

                                                                  Anna Gay Posted by Ana Gay

Anna Gay is a portrait photographer based in Athens, GA and the author of the dPS ebook The Art of Self-Portraiture. She also designs actions and textures for Photoshop. When she is not shooting or writing, she enjoys spending time with her husband, and their two cats, Elphie and Fat Cat.

If you prefer to shoot in natural light, you may not always have the luxury of photographing your clients in a private space. If you are photographing them in public, though, this can pose its on set of challenges! Here are a few tips on how to make photographing your clients in public a positive experience.

  1. Get to know your client. If they are really outgoing, then photographing them in a public area should be a breeze. If they are at all shy or self-conscious in front of the camera, though, they may not enjoy having their photo made in a location with a lot of people around. Personally, I’m fairly shy, and I get super-duper-self-conscious when someone is taking my picture, so I prefer to have as few people around as possible!
  2. If you do have a shy client on your hands, try finding a secluded spot. For example, if you are in a park, try to get away from the areas that have a lot of pedestrian traffic. Plus, if you get off the beaten path (literally) you may find areas that are more photogenic.
  3. Try to find a location that is familiar to your client. Maybe they have a favorite spot – like a park, or even a favorite neighborhood in their city. Choosing a location that is familiar, or meaningful, to your client will help put them at ease in front of the camera.
  4. Be considerate of the people who are not in your photo. There are few things more annoying than a photographer who swoops in and completely dominates the area! Be mindful of others who are nearby, and keep as low of a profile as you can. Drawing as little attention to yourself as a photographer will help reduce the amount of attention on your client from bystanders.
  5. Also, with the thought of being low-key in mind, you may want to consider lightening your load in terms of equipment when you are photographing in public. Lugging around a lot of gear is not only difficult, but having a huge set-up can be a nuisance to people in the area who are not having you take their picture.
  6. Last but not least, when you are photographing in public, make 100% sure that you do not need a permit to be photographing in your selected location. It sounds wild, but a lot of public places, such as parks, do require professional photographers to obtain a license before their shoot. I can’t think of anything more awkward than being asked to leave a location because you didn’t pick up a license beforehand, so doing some quick research on this before your shoot can save you time and embarrassment!
Mar 142014


Posted by Anna Gay  |

I’m pretty sure we have all been in this situation, at least once: you’re hired for a shoot, and the location is far from aesthetically pleasing. Whether you’re shooting portraits, commercial work, or environmental photos, there are plenty of ways you can work around the fact that you’re in a not-so-interesting location.

1. Shoot From Interesting Angles 

Take a moment to look at the scene, visualizing angles that will make your composition more interesting. Sometimes, shooting from a higher, or lower, angle than you would normally shoot will make all the difference in the world, and will also help take attention away from the aspects of the location that are not as interesting as others.

2. Focus Experiment with focus

If you are photographing people, try shooting with a wide aperture in order to blur out the location, and bring focus to your subject. If you are not photographing people, look for interesting details in the location, and focus in on the details, rather than the scope of the scene.

3. Lighting 

If you have a flash, or any type of studio light, a little bit of light can go a long way in upping the interest factor in your photos. Experiment with low and high key light, and also, similar to focus, look for interesting details in the location to accentuate with lighting.

4. Time of Day

A location may be uninteresting at one time of day, but at a different time of day, it may look completely different. Try shooting in the golden hour – either early in the morning, or late in the evening, to achieve golden, hazy light. Or, think about how the scene would look at night, shot with a long exposure.

5. Post-Processing 

When in doubt, consult Lightroom and Photoshop! The danger in post-processing photos from an uninteresting location, however, is the tendency some people have to over-edit. This is a situation where you really, really need not over-edit, as it will appear as though you are over-compensating, thus drawing attention to the uninteresting location. Keep it simple – see how the image looks in black and white, or try your hand at (extremely minimal) HDR, in order to bring out more highlights and shadows.

These are just a few of the many possibilities for making a location appear more interesting. Do you have any tips or tricks you would like to share?